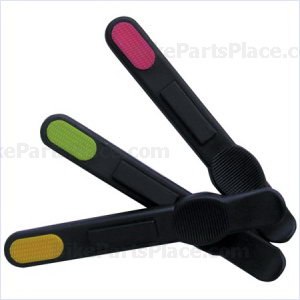
- Tire tools are a necessity for changing tires.
- A pair of plastic tire levers costs between $4 and $5.
- Do not use screwdrivers or other flat metal tools to change tires.
One of the quickest ways to ruin a ride – either before it starts or in the middle of it – is a flat tire.
Quite often, there’s not much you can do about it beforehand. It’s usually a sharp rock, piece of glass or something else in the road or path that caused it. And you can’t avoid everything. You’re going to need tire tools.
So after you’ve come to a stop – hopefully safely and fully upright – it’s time to address the situation. That tire has to come off and the tube needs to be replaced. And then the tire needs to go back on, too.
Before getting into the process of changing a tire, it helps to know a little bit about the parts involved.
On clincher wheels – the kind ridden by the vast majority of cyclists around the world – each rim has a hooked inner edge. Clincher tires have a stiff inner portion called the bead, which locks into the hooked edge of the wheel.
The bead and hooked rim work together to keep the tube and tire connected to the wheel.
To change a tire, you’ll need to pry the bead away from the hooked edge and over the top of the rim. A common, inexpensive plastic tool called a lever – or a tire iron, in some places – is one of the necessary tire tools.
Typically costing around $4 or $5 per pair, a tire lever has a hooked end about ¾ of an inch across with about a four-inch handle for leverage. Most levers will have a spoke hook on the opposite end to hold it one lever place while you work with the other one.
Though it seems like it would work, do not use a screwdriver, butter knife or any other thin, sharp-edged metal tool. It may end up getting the job done, but it could damage the tire’s sidewall and bead, as well as the rim itself. Gouges in the rim’s metal could then damage the tire further.
Once the tire is completely flat, insert the two tire levers between the tire and the rim, about six inches apart. Hook the bead of the tire with each of the hooks on the lever and then pull the handles down, toward the wheel’s hub. With a little bit of prying, the bead will pop over the edge of the rim. Slide one of the levers around the rest of the rim to remove the tire.
When putting the tire back on, try not to use levers. By rolling the bead over the edge of the rim, there’s less risk of damaging it or the rim itself. It takes a bit of practice, so don’t expect a quick change if you’ve never done it before.
There are a number of brands of tire levers out there – Pedro’s, Bontrager, Profile Design, etc. – and most are made of plastic. A company called Lezyne makes aluminum levers in the same shape as the plastic models. Such levers should not be used on high-end rims, as they could damage the surface. It goes without saying, as well, that aluminum levers should not be used on carbon rims of any type.
Tags: tire tools


 Shopping


You’re right about those clincher wheels. Hard to get that tire off without a hooked tool. And no, flat-edged metal implements are never good for changing tires out. I used to carry a trimmed down knitting needle because it had a hooked end on it. It worked, but it was thin and awkward to use. I even tried a beer can opener (the old kind that punctured a hole in the can). Even being really careful, I still damaged the tire. Needless to say, that was an emergency situation. I will check out one of these new tire tools.